Saturday, 22 December 2018

You Might Not Need thread-loader

It all started with a GitHub issue. Ernst Ammann reported:

Without the thread-loader, compilation takes three to four times less time on changes. We could remove it.

If you're not aware of the webpack-config-plugins project then I commend it to you. Famously, webpack configuration can prove tricky. webpack-config-plugins borrows the idea of presets from Babel. It provides a number of pluggable webpack configurations which give a best practice setup for different webpack use cases. So if you're no expert with webpack and you want a good setup for building your TypeScript / Sass / JavaScript then webpack-config-plugins has got your back.

One of the people behind the project is the very excellent Jan Nicklas who is well known for his work on the html-webpack-plugin.

It was Jan who responded to Ernst's issue and decided to look into it.

All I Want For Christmas is Faster Builds

Everyone wants fast builds. I do. You do. We all do. webpack-config-plugins is about giving these to the user in a precooked package.

There's a webpack loader called thread-loader which spawns multiple processes and splits up work between them. It was originally inspired by the work in the happypack project which does a similar thing.

I wrote a blog post some time ago which gave details about ways to speed up your TypeScript builds by combining the ts-loader project (which I manage) with the fork-ts-checker-webpack-plugin project (which I'm heavily involved with).

That post was written back in the days of webpack 2 / 3. It advocated use of both happypack / thread-loader to drop your build times even further. As you'll see, now that we're well into the world of webpack 4 (with webpack 5 waiting in the wings) the advantage of happypack / thread-loader are no longer so profound.

webpack-config-plugins follows the advice I set out in my post; it uses thread-loader in its pluggable configurations. Now, back to Ernst's issue.

thread-loader: Infinity War

Jan quickly identified the problem. He did that rarest of things; he read the documentation which said:


      // timeout for killing the worker processes when idle
      // defaults to 500 (ms)
      // can be set to Infinity for watching builds to keep workers alive
      poolTimeout: 2000,

The webpack-config-plugins configurations (running in watch mode) were subject to the thread loaders being killed after 500ms. They got resurrected when they were next needed; but that's not as instant as you might hope. Jan then did a test:


(default pool - 30 runs - 1000 components ) average: 2.668068965517241
(no thread-loader - 30 runs - 1000 components ) average: 1.2674137931034484
(Infinity pool - 30 runs - 1000 components ) average: 1.371827586206896

This demonstrates that using thread-loader in watch mode with poolTimeout: Infinity performs significantly better than when it defaults to 500ms. But perhaps more significantly, not using thread-loader performs even better still.

"Maybe You've Thread Enough"

When I tested using thread-loader in watch mode with poolTimeout: Infinity on my own builds I got the same benefit Jan had. I also got even more benefit from dropping thread-loader entirely.

A likely reason for this benefit is that typically when you're developing, you're working on one file at a time. Hence you only transpile one file at a time:

So there's not a great deal of value that thread-loader can add here; mostly it's twiddling thumbs and adding an overhead. To quote the docs:

Each worker is a separate node.js process, which has an overhead of ~600ms. There is also an overhead of inter-process communication.

Use this loader only for expensive operations!

Now, my build is not your build. I can't guarantee that you'll get the same results as Jan and I experienced; but I would encourage you to investigate if you're using thread-loader correctly and whether it's actually helping you. In these days of webpack 4+ perhaps it isn't.

There are still scenarios where thread-loader still provides an advantage. It can speed up production builds. It can speed up the initial startup of watch mode. In fact Jan has subsequently actually improved the thread-loader to that specific end. Yay Jan!

If this is all too much for you, and you want to hand off the concern to someone else then perhaps all of this serves as a motivation to just sit back, put your feet up and start using webpack-config-plugins instead of doing your own configuration.

Monday, 10 December 2018

Cache Rules Everything Around Me

One thing that ASP.Net Core really got right was caching. IMemoryCache is a caching implementation that does just what I want. I love it. I take it everywhere. I've introduced it to my family.

TimeSpan, TimeSpan Expiration Y'all

To make usage of the IMemoryCache even more lovely I've written an extension method. I follow pretty much one cache strategy: SetAbsoluteExpiration and I just vary the expiration by an amount of time. This extension method implements that in a simple way; I call it GetOrCreateForTimeSpanAsync - catchy right? It looks like this:


using System;
using System.Threading.Tasks;
using Microsoft.Extensions.Caching.Memory;

namespace My.Helpers {

    public static class CacheHelpers {

        public static async Task<TItem> GetOrCreateForTimeSpanAsync<TItem>(
            this IMemoryCache cache,
            string key,
            Func<Task<TItem>> itemGetterAsync,
            TimeSpan timeToCache
        ) {
            if (!cache.TryGetValue(key, out object result)) {
                result = await itemGetterAsync();
                if (result == null)
                    return default(TItem);

                var cacheEntryOptions = new MemoryCacheEntryOptions()
                    .SetAbsoluteExpiration(timeToCache);

                cache.Set(key, result, cacheEntryOptions);
            }

            return (TItem) result;
        }
    }
}

Usage looks like this:


private Task GetSuperInterestingThingFromCache(Guid superInterestingThingId) => 
    _cache.GetOrCreateForTimeSpanAsync(
        key: $"{nameof(MyClass)}:GetSuperInterestingThing:{superInterestingThingId}",
        itemGetterAsync: () => GetSuperInterestingThing(superInterestingThingId),
        timeToCache: TimeSpan.FromMinutes(5)
    );

This helper allows the consumer to provide three things:

  • The key key for the item to be cached with
  • A itemGetterAsync which is the method that is used to retrieve a new value if an item cannot be found in the cache
  • A timeToCache which is the period of time that an item should be cached

If an item can't be looked up by the itemGetterAsync then nothing will be cached and a the default value of the expected type will be returned. This is important because lookups can fail, and there's nothing worse than a lookup failing and you caching null as a result.

Go on, ask me how I know.

This is a simple, clear and helpful API which makes interacting with IMemoryCache even more lovely than it was. Peep it y'all.

Saturday, 17 November 2018

Snapshot Testing for C#

If you're a user of Jest, you've no doubt heard of and perhaps made use of snapshot testing.

Snapshot testing is an awesome tool that is generally discussed in the context of JavaScript React UI testing. But snapshot testing has a wider application than that. Essentially it is profoundly useful where you have functions which produce a complex structured output. It could be a React UI, it could be a list of FX prices. The type of data is immaterial; it's the amount of it that's key.

Typically there's a direct correlation between the size and complexity of the output of a method and the length of the tests that will be written for it. Let's say you're outputting a class that contains 20 properties. Congratulations! You get to write 20 assertions in one form or another for each test case. Or a single assertion whereby you supply the expected output by hand specifying each of the 20 properties. Either way, that's not going to be fun. And just imagine the time it would take to update multiple test cases if you wanted to change the behaviour of the method in question. Ouchy.

Time is money kid. What you need is snapshot testing. Say goodbye to handcrafted assertions and hello to JSON serialised output checked into source control. Let's unpack that a little bit. The usefulness of snapshot testing that I want in C# is predominantly about removing the need to write and maintain multiple assertions. Instead you write tests that compare the output of a call to your method with JSON serialised output you've generated on a previous occasion.

This approach takes less time to write, less time to maintain and the solid readability of JSON makes it more likely you'll pick up on bugs. It's so much easier to scan JSON than it is a list of assertions.

Putting the Snapshot into C#

Now if you're writing tests in JavaScript or TypeScript then Jest already has your back with CLI snapshot generation and shouldMatchSnapshot. However getting to nearly the same place in C# is delightfully easy. What are we going to need?

First up, a serializer which can take your big bad data structures and render them as JSON. Also we'll use it to rehydrate our data structure into an object ready for comparison. We're going to use Json.NET.

Next up we need a way to compare our outputs with our rehydrated snapshots - we need a C# shouldMatchSnapshot. There's many choices out there, but for my money Fluent Assertions is king of the hill.

Finally we're going to need Snapshot, a little helper utility I put together:


using System;
using System.IO;
using Newtonsoft.Json;
using Newtonsoft.Json.Serialization;

namespace Test.Utilities {
    public static class Snapshot {
        private static readonly JsonSerializer StubSerializer = new JsonSerializer { 
            ContractResolver = new CamelCasePropertyNamesContractResolver(),
            NullValueHandling = NullValueHandling.Ignore 
        };

        private static JsonTextWriter MakeJsonTextWriter(TextWriter sw) => new JsonTextWriter(sw) {
            Formatting = Formatting.Indented,
            IndentChar = ' ',
            Indentation = 2
        };

        /// <summary>
        /// Make yourself some JSON! Usage looks like this:
        /// Stubs.Make($"{System.AppDomain.CurrentDomain.BaseDirectory}..\\..\\..\\data.json", myData);
        /// </summary>
        public static void Make<T>(string stubPath, T data) {
            try {
                if (string.IsNullOrEmpty(stubPath))
                    throw new ArgumentNullException(nameof(stubPath));
                if (data == null)
                    throw new ArgumentNullException(nameof(data));

                using(var sw = new StreamWriter(stubPath))
                using(var writer = MakeJsonTextWriter(sw)) {
                    StubSerializer.Serialize(writer, data);
                }
            } catch (Exception exc) {
                throw new Exception($"Failed to make {stubPath}", exc);
            }
        }

        public static string Serialize<T>(T data) {
            using (var sw = new StringWriter())
            using(var writer = MakeJsonTextWriter(sw)) {
                StubSerializer.Serialize(writer, data);
                return sw.ToString();
            }
        }

        public static string Load(string filename) {
            var content = new StreamReader(
                File.OpenRead(filename)
            ).ReadToEnd();

            return content;
        }
    }
}

Let's look at the methods: Make and Load. Make is what we're going to use to create our snapshots. Load is what we're going to use to, uh, load our snapshots.

What does usage look like? Great question. Let's go through the process of writing a C# snapshot test.

Taking Snapshot for a Spin

First of all, we're going to need a method to test that outputs a data structure which is more than just a scalar value. Let's use this:


public class Leopard {
    public string Name { get; set; }
    public int Spots { get; set; }
}

public class LeopardService {
    public Leopard[] GetTheLeopards() {
        return new Leopard[] {
            new Leopard { Spots = 42, Name = "Nimoy" },
            new Leopard { Spots = 900, Name = "Dotty" }
        };
    }
}

Yes - our trusty LeopardService. As you can see, the GetTheLeopards method returns an array of Leopards. For now, let's write a test using Snapshot: (ours is an XUnit test; but Snapshot is agnostic of this)


[Fact]
public void GetTheLeopards_should_return_expected_Leopards() {
    // Arrange
    var leopardService = new LeopardService();

    // Act
    var leopards = leopardService.GetTheLeopards();
    
    // UNCOMMENT THE LINE BELOW *ONLY* WHEN YOU WANT TO GENERATE THE SNAPSHOT
    Snapshot.Make($"{System.AppDomain.CurrentDomain.BaseDirectory}..\\..\\..\\Snapshots\\leopardsSnapshot.json", leopards);

    // Assert
    var snapshotLeopards = JsonConvert.DeserializeObject(Snapshot.Load("Snapshots/leopardsSnapshot.json"));
    snapshotLeopards.Should().BeEquivalentTo(leopards);
}

Before we run this for the first time we need to setup our testing project to be ready for snapshots. First of all we add a Snapshot folder to the test project. The we also add the following to the .csproj:


  <ItemGroup>
    <Content Include="Snapshots\**">
      <CopyToOutputDirectory>Always</CopyToOutputDirectory>
    </Content>
  </ItemGroup>

This includes the snapshots in the compile output for when tests are being run.

Now let's run the test. It will generate a leopardsSnapshot.json file:


[
  {
    "name": "Nimoy",
    "spots": 42
  },
  {
    "name": "Dotty",
    "spots": 900
  }
]

With our snapshot in place, we comment out the Snapshot.Make... line and we have a passing test. Let's commit our code, push and go about our business.

Time Passes...

Someone decides that the implementation of GetTheLeopards needs to change. Defying expectations it seems that Dotty the leopard should now have 90 spots. I know... Business requirements, right?

If we make that change we'd ideally expect our trusty test to fail. Let's see what happens:


----- Test Execution Summary -----

Leopard.Tests.Services.LeopardServiceTests.GetTheLeopards_should_return_expected_Leopards:
    Outcome: Failed
    Error Message:
    Expected item[1].Spots to be 90, but found 900.

Boom! We are protected!

Since this is a change we're completely happy with we want to update our leopardsSnapshot.json file. We could make our test pass by manually updating the JSON. That'd be fine. But why work when you don't have to? Let's uncomment our Snapshot.Make... line and run the test the once.


[
  {
    "name": "Nimoy",
    "spots": 42
  },
  {
    "name": "Dotty",
    "spots": 90
  }
]

That's right, we have an updated snapshot! Minimal effort.

Next Steps

This is a basic approach to getting the goodness of snapshot testing in C#. It could be refined further. To my mind the uncommenting / commenting of code is not the most elegant way to approach this and so there's some work that could be done around this area.

Happy snapshotting!

Saturday, 27 October 2018

Making a Programmer

I recently had the good fortune to help run a coding bootcamp. The idea was simple: there are many people around us who are interested in programming but don't know where to start. Let's take some folk who do and share the knowledge.

The bootcamp went tremendously! (Well, I say that... Frankly I had a blast. πŸ˜€ )

Coding padawans walked in at the start with laptops and questions, and six weeks later they left with the groundwork of development experience. We ran a session for an hour during lunchtime once a week. Between that, people would have the opportunity to learn online, do exercises and reach out to the facilitators and their fellow apprentices for help.

We'd never done this before. We were student teachers; learning how to teach as we ran the course. So what did we do? Are you curious? Read on, Macduff!

Code Review

It's worth saying now that we started our course with a plan: the plan was that we would be ready to change the plan. Or to put it another way, we were ready to pivot as we went.

We (by which I mean myself and the other course organisers) are interested in feedback. Sitting back and saying "Hey! We did this thing.... What do you think about it?" Because sometimes your plans are great. Do more of that hotness! But also, not all your ideas pan out... Maybe bail on those guys. Finally, never forget: other folk have brain tickling notions too.... We're with Picasso on this: good artists copy; great artists steal.

We're heavily invested in feedback in both what we build and how we build it. So we were totally going to apply this to doing something we'd never done before. So seized were we of this that we made feedback part of the session. For the last five minutes each week we'd run a short retrospective. We'd stick up happy, sad and "meh" emojis to the wall, hand out post-its and everyone got to stick up their thoughts.

From that we learned what was working, what wasn't and when we were very lucky there were suggestions too. We listened to all the feedback and the next week's session would be informed by what we'd just learned.

Merging to Master

So, what did we end up with? What did our coding bootcamp look like?

Well, to start each session we kicked off with an icebreaker. We very much wanted the sessions to be interactive experiences; we wanted them to feel playful and human. So an icebreaker was a good way to get things off on the right foot.

The IBs were connected with the subject at hand. For example: Human FizzBuzz. We took the classic interview question and applied it to wannabe coders. We explained the rules, and went round in a circle, each person was the next iteration of the loop. As each dev-in-training opened their mouths they had to say a number or "Fizz" or "Buzz" or "FizzBuzz". (It turns out this is harder than you think; and makes for a surprisingly entertaining parlour game. I intend to do this at my next dinner party.)

After that we covered the rules of the game. (Yup, learning is a game and it's a good 'un.) Certainly the most important rule was this: there are *no* stupid questions. If people think there are, then they might be hesitant to ask. And any question benched is a learning opportunity lost. We don't want that.

"Ask any question!" we said each week. Kudos to the people who have the courage to pipe up. We salute you! You're likely putting voice to a common area of misunderstanding.

Then we'd move onto the main content. The initial plan was to make use of the excellent EdX Python course Between each session our learners would do a module and then we'd come together and talk around that topic somewhat. Whilst this was a good initial plan it did make the learning experience somewhat passive and less interactive than we'd hoped.

One week we tried something different. It turns out that the amazing JMac has quite the skill for writing programming exercises. Small coding challenges that people can tackle independently. JMac put together a repl.it of exercises and encouraged the class to get stuck in. They did. So much so that at the end of the session it was hard to get everyone's attention to let them know the session was over. They were in the zone. When we did finally disrupt their flow, the feedback was pretty unanimous: we'd hit paydirt.

Consequently, that was the format going onwards. JMac would come up with a number of exercises for the class. Wisely they were constructed so that they gently levelled up in terms of complexity as you went on. You'd get the dopamine hit of satisfaction as you did the earliest challenges that would give you the confidence to tackle the more complex later problems. If peeps got stuck they could ask someone to advise them, a facilitator or a peer. Or they could google it.... Like any other dev.

Having the chance to talk with others when you're stuck is fantastic. You can talk through a problem. The act of doing that is a useful exercise. When you talk through a problem out loud you can unlock your understanding and often get to the point where you can tackle this yourself. This is rubber duck debugging. Any dev does this in their everyday; it makes complete sense to have it as part of a coding bootcamp.

We learned that it was useful, very useful, to have repitition in the exercises. Repitition. Repitition. Repitition. As the exercises started each week they would typically begin by recapping and repeating the content covered the previous week. The best way to learn is to practice. It's not for nothing the Karate Kid had to "wax on, wax off".

Finally, we did this together. The course wasn't run by one person; we had a gang! We had three facilitators who helped to run the sessions; JMac, Jonesy and myself. We also had the amazing Janice who handled the general organisation and logistics. And made us laugh. A lot. This was obviously great from a camaraderie and sharing the load perspective. It turns out that having that number of facilitators in the session meant that everyone who needed help could get it. It's worth noting that having more than a single facilitator is useful in terms of the dynamic it creates. You can bounce things off one another; you can use each other for examples and illustrations. You can crack each other up. Done well it reduces the instructor / learner divide and that breaking down of barriers is something worth seeking.

RTM

We've run a bootcamp once now. Where we are is informed by the experience we've just had. A different group of learners may well have resulted in a slightly different format; though I have a feeling not overly dissimilar. We feel pretty sure that what we've got is pretty solid. That said, just as the attendees are learning about development, we're still learning about learning!

Sunday, 7 October 2018

Brand New Fonting Awesomeness

Love me some Font Awesome. Absolutely wonderful. However, I came a cropper when following the instructions on using the all new Font Awesome 5 with React. The instructions for standard icons work fine. But if you want to use brand icons then this does not help you out much. There's 2 problems:

  1. Font Awesome's brand icons are not part of @fortawesome/free-solid-svg-icons package
  2. The method of icon usage illustrated (i.e. with the FontAwesomeIcon component) doesn't work. It doesn't render owt.

Brand Me Up Buttercup

You want brands? Well you need the @fortawesome/free-brands-svg-icons. Obvs, right?


yarn add @fortawesome/fontawesome-svg-core
yarn add @fortawesome/free-brands-svg-icons
yarn add @fortawesome/react-fontawesome

Now usage:


import * as React from 'react'
import { FontAwesomeIcon } from '@fortawesome/react-fontawesome';
import { faReact } from '@fortawesome/free-brands-svg-icons';

export const Framework = () => (
  <div>
    Favorite Framework: <FontAwesomeIcon icon={faReact} />
  </div>
)

Here we've ditched the "library / magic-string" approach from the documentation for one which explicitly imports and uses the required icons. I suspect this will be good for tree-shaking as well but, hand-on-heart, I haven't rigorously tested that. I'm not sure why the approach I'm using isn't documented actually. Mysterious! I've seen no ill-effects from using it but perhaps YMMV. Proceed with caution...

Update: It is documented!

Yup - information on this approach is out there; but it's less obvious than you might hope. Read all about it here. For what it's worth, the explicit import approach seems to be playing second fiddle to the library / magic-string one. I'm not too sure why. For my money, explicit imports are clearer, less prone to errors and better setup for optimisation. Go figure...

Feel free to set me straight in the comments!

Sunday, 23 September 2018

ts-loader Project References: First Blood

So project references eh? They shipped with TypeScript 3. We've just shipped initial support for project references in ts-loader v5.2.0. All the hard work was done by the amazing Andrew Branch. In fact I'd recommend taking a gander at the PR. Yay Andrew!

This post will take us through the nature of the support for project references in ts-loader now and what we hope the future will bring. It rips off shamelessly borrows from the README.md documentation that Andrew wrote as part of the PR. Because I am not above stealing.

TL;DR

Using project references currently requires building referenced projects outside of ts-loader. We don’t want to keep it that way, but we’re releasing what we’ve got now. To try it out, you’ll need to pass projectReferences: true to loaderOptions.

Like tsc, but not like tsc --build

ts-loader has partial support for project references in that it will load dependent composite projects that are already built, but will not currently build/rebuild those upstream projects. The best way to explain exactly what this means is through an example. Say you have a project with a project reference pointing to the lib/ directory:


tsconfig.json
app.ts
lib/
  tsconfig.json
  niftyUtil.ts

And we’ll assume that the root tsconfig.json has { "references": { "path": "lib" } }, which means that any import of a file that’s part of the lib sub-project is treated as a reference to another project, not just a reference to a TypeScript file. Before discussing how ts-loader handles this, it’s helpful to review at a really basic level what tsc itself does here. If you were to run tsc on this tiny example project, the build would fail with the error:


error TS6305: Output file 'lib/niftyUtil.d.ts' has not been built from source file 'lib/niftyUtil.ts'.

Using project references actually instructs tsc not to build anything that’s part of another project from source, but rather to look for any .d.ts and .js files that have already been generated from a previous build. Since we’ve never built the project in lib before, those files don’t exist, so building the root project fails. Still just thinking about how tsc works, there are two options to make the build succeed: either run tsc -p lib/tsconfig.json first, or simply run tsc --build, which will figure out that lib hasn’t been built and build it first for you.

Ok, so how is that relevant to ts-loader? Because the best way to think about what ts-loader does with project references is that it acts like tsc, but not like tsc --build. If you run ts-loader on a project that’s using project references, and any upstream project hasn’t been built, you’ll get the exact same error TS6305 that you would get with tsc. If you modify a source file in an upstream project and don’t rebuild that project, ts-loader won’t have any idea that you’ve changed anything—it will still be looking at the output from the last time you built that file.

“Hey, don’t you think that sounds kind of useless and terrible?”

Well, sort of. You can consider it a work-in-progress. It’s true that on its own, as of today, ts-loader doesn’t have everything you need to take advantage of project references in webpack. In practice, though, consuming upstream projects and building upstream projects are somewhat separate concerns. Building them will likely come in a future release. For background, see the original issue.

outDir Windows problemo.

At the moment, composite projects built using the outDir compiler option cannot be consumed using ts-loader on Windows. If you try to, ts-loader throws a "has not been built from source file" error. You can see Andrew and I puzzling over it in the PR. We don't know why yet; it's possible there's a bug in tsc. It's more likely there's a bug in ts-loader. Hopefully it's going to get solved at some point. (Hey, maybe you're the one to solve it!) Either way, we didn't want to hold back from releasing. So if you're building on Windows then avoid building composite projects using outDir.

Saturday, 15 September 2018

Ivan Drago and Definitely Typed

This a tale of things that are and things that aren't. It's a tale of semantic versioning, the lack thereof and heartbreak. It's a story of terror and failing builds. But it has a bittersweet ending wherein our heroes learn a lesson and understand the need for compromise. We all come out better and wiser people. Hopefully there's something for everybody; let's start with an exciting opener and see where it goes...

Definitely Typed

This is often the experience people have of using type definitions from Definitely Typed:

Specifically, people are used to the idea of semantic versioning and expect it from types published to npm by Definitely Typed. They wait in vain. I've written before about the Definitely Typed / @types semantic version compromise. And I wanted to talk about it a little further as (watching the issues raised on DT) I don't think the message has quite got out there. To summarise:

  1. npm is built on top of semantic versioning and they take it seriously. When a package is published it should be categorised as a major release (breaking changes), a minor release (extra functionality which is backwards compatible) or a patch release (backwards compatible bug fixes).

  2. Definitely Typed publishes type definitions to npm under the @types namespace

  3. To make consumption of type definitions easier, the versioning of a type definition package will seek to emulate the versioning of the npm package it supports. For example, right now react-router's latest version is 4.3.1. The corresponding type definition @types/react-router's latest version is 4.0.31. (It's fairly common for type definition versions to lag behind the package they type.)

    If there's a breaking change to the react-router type definition then the new version published will have a version number that begins "4.0.". If you are relying on semantic versioning this will break you.

I Couldn't Help But Notice Your Pain

If you're reading this and can't quite believe that @types would be so inconsiderate as to break the conventions of the ecosystem it lives in, I understand. But hopefully you can see there are reasons for this. In the end, being able to use npm as a delivery mechanism for versioned type definitions associated with another package has a cost; that cost is semantic versioning for the type definitions themselves. It wasn't a choice taken lightly; it's a pragmatic compromise.

"But what about my failing builds? Fine, people are going to change type definitions, but why should I burn because of their choices?"

Excellent question. Truly. Well here's my advice: don't expect semantic versioning where there is none. Use specific package versions. You can do that directly with your package.json. For example replace something like this: "@types/react-router": "^4.0.0" with a specific version number: "@types/react-router": "4.0.31". With this approach it's a specific activity to upgrade your type definitions. A chore if you will; but a chore that guarantees builds will not fail unexpectedly due to changing type defs.

My own personal preference is yarn. Mother, I'm in love with a yarn.lock file. It is the alternative npm client that came out of Facebook. It pins the exact versions of all packages used in your yarn.lock file and guarantees to install the same versions each time. Problem solved; and it even allows me to keep the semantic versioning in my package.json as is.

This has some value in that when I upgrade I probably want to upgrade to a newer version following the semantic versioning convention. I should just expect that I'll need to check valid compilation when I do so. yarn even has it's own built in utility that tells you when things are out of date: yarn outdated:

So lovely

You Were Already Broken - I Just Showed You How

Before I finish I wanted to draw out one reason why breaking changes can be a reason for happiness. Because sometimes your code is wrong. An update to a type definition may highlight that. This is analogous to when the TypeScript compiler ships a new version. When I upgrade to a newer version of TypeScript it lights up errors in my codebase that I hadn't spotted. Yay compiler!

An example of this is a PR I submitted to DefinitelyTyped earlier this week. This PR changed how react-router models the parameters of a Match. Until now, an object was expected; the user could define any object they liked. However, react-router will only produce string values for a parameter. If you look at the underlying code it's nothing more than an exec on a regular expression.

My PR enforces this at type level by changing this:


export interface match<P> {
  params: P;
  ...
}

To this


export interface match<Params extends { [K in keyof Params]?: string } = {}> {
  params: Params;

So any object definition supplied must have string values (and you don't actually need to supply an object definition; that's optional now).

I expected this PR to break people and it did. But this is a useful break. If they were relying upon their parameters to be types other than strings they would be experiencing some unexpected behaviour. In fact, it's exactly this that prompted my PR in the first place. A colleague had defined his parameters as numbers and couldn't understand why they weren't behaving like numbers. Because they weren't numbers! And wonderfully, this will now be caught at compile time; not runtime. Yay!

Tuesday, 21 August 2018

πŸ’£ing Relative Paths with TypeScript and webpack

I write a lot of TypeScript. Because I like modularity, I split up my codebases into discreet modules and import from them as necessary.

Take a look at this import:


import * as utils from '../../../../../../../shared/utils';

Now take a look at this import:


import * as utils from 'shared/utils';

Which do you prefer? If the answer was "the first" then read no further. You have all you need, go forth and be happy. If the answer was "the second" then stick around; I can help!

TypeScript

There's been a solution for this in TypeScript-land for some time. You can read the detail in the "path mapping" docs here.

Let's take a slightly simpler example; we have a folder structure that looks like this:


projectRoot 
├── components 
│ └── page.tsx (imports '../shared/utils') 
├── shared 
│ ├── folder1 
│ └── folder2 
│ └── utils.ts 
└── tsconfig.json

We would like page.tsx to import 'shared/utils' instead of '../shared/utils'. We can, if we augment our tsconfig.json with the following properties:


{ 
  "compilerOptions": { 
    "baseUrl": ".", 
    "paths": { 
       "components/*": ["components/*"],
       "shared/*": ["shared/*"]
    }
  }
}

Then we can use option 2. We can happily write:


import * as utils from 'shared/utils';

My code compiles, yay.... Ship it!

Let's not get over-excited. Actually, we're only part-way there; you can compile this code with the TypeScript compiler.... But is that enough?

I bundle my TypeScript with ts-loader and webpack. If I try and use my new exciting import statement above with my build system then disappointment is in my future. webpack will be all like "import whuuuuuuuut?"

You see, webpack doesn't know what we told the TypeScript compiler in the tsconfig.json. Why would it? It was our little secret.

webpack resolve.alias to the rescue!

This same functionality has existed in webpack for a long time; actually much longer than it has existed in TypeScript. It's the resolve.alias functionality.

So, looking at that I should be able to augment my webpack.config.js like so:


module.exports = {
  //...
  resolve: {
    alias: {
      components: path.resolve(process.cwd(), 'components/'),
      shared: path.resolve(process.cwd(), 'shared/'),
    }
  }
};

And now both webpack and TypeScript are up to speed with how to resolve modules.

DRY with the tsconfig-paths-webpack-plugin

When I look at the tsconfig.json and the webpack.config.js something occurs to me: I don't like to repeat myself. As well as that, I don't like to repeat myself. It's so... Repetitive.

The declarations you make in the tsconfig.json are re-stated in the webpack.config.js. Who wants to maintain two sets of code where one would do? Not me.

Fortunately, you don't have to. There's the tsconfig-paths-webpack-plugin for webpack which will do the job for you. You can replace your verbose resolve.alias with this:


module.exports = {
  //...
  resolve: {
    plugins: [new TsconfigPathsPlugin({ /*configFile: "./path/to/tsconfig.json" */ })]
  }
};

This does the hard graft of reading your tsconfig.json and translating path mappings into webpack aliases. From this point forward, you need only edit the tsconfig.json and everything else will just work.

Thanks to Jonas Kello, author of the plugin; it's tremendous! Thanks also to Sean Larkin and Stanislav Panferov (of awesome-typescript-loader) who together worked on the original plugin that I understand the tsconfig-paths-webpack-plugin is based on. Great work!

Saturday, 28 July 2018

Docker and Configuration on Azure Web App for Containers: Whither Colons?

App Services have long been a super simple way to spin up a web app in Azure. The barrier to entry is low, maintenance is easy. It just works. App Services recently got a turbo boost in the form of Azure App Service on Linux. Being able to deploy to Linux is exciting enough; but the real reason this is notable because you can deploy Docker images that will be run as app services.

I cannot over-emphasise just how easy this makes getting a Docker image into Production. Yay Azure!

The Mystery of Configuration

Applications need configuration. ASP.Net Core applications are typically configured by an appsettings.json file which might look like so:


    {
      "Parent": {
        "ChildOne": "I'm a little teapot",
        "ChildTwo": "Short and stout"
      }
    }

With a classic App Service you could override a setting in the appsettings.json by updating "Application settings" within the Azure portal. You'd do this in the style of creating an Application setting called Parent:ChildOne or Parent:ChildTwo. To be clear: using colons to target a specific piece of config.

You can read about this approach here. Now there's something I want you to notice; consider the colons below:

If you try and follow the same steps when you're using Web App for Containers / i.e. a Docker image deployed to an Azure App Service on Linux you cannot use colons:

When you hover over the error you see this message: This field can only contain letters, numbers (0-9), periods ("."), and underscores ("_"). Using . does not work alas.

What do I do?

So it turns out you just can't configure App Services on Linux.

Jokes!

No, of course you can and here I can help. After more experimentation than I'd like to admit I happened upon the answer. Here it is:

Where you use : on a classic App Service, you should use a __ (double underscore) on an App Service with containers. So Parent__ChildOne instead of Parent:ChildOne. It's as simple as that.

Why is it like this?

Honestly? No idea. I can't find any information on the matter. Let me know if you find out.

Monday, 9 July 2018

Cypress and Auth0

Cypress is a fantastic way to write UI tests for your web apps. Just world class. Wait, no. Galaxy class. I'm going to go one further: universe class. You get my drift.

Here's a pickle for you. You have functionality that lies only behind the walled garden of authentication. You want to write tests for these capabilities. Assuming that authentication takes place within your application that's no great shakes. Authentication is part of your app; it's no big deal using Cypress to automate logging in.

Auth is a serious business and, as Cypress is best in class for UI testing, I'll say that Auth0 is romping home with the same title in the auth-as-a-service space. My app is using Auth0 for authentication. What's important to note about this is the flow. Typically when using auth-as-a-service, the user is redirected to the auth provider's site to authenticate and then be redirected back to the application post-login.

Brian Mann (of Cypress fame) has been fairly clear when talking about testing with this sort of authentication flow:

You're trying to test SSO - and we have recipes showing you exactly how to do this.

Also best practice is never to visit or test 3rd party sites not under your control. You don't control microsoftonline, so there's no reason to use the UI to test this. You can programmatically test the integration between it and your app with cy.request - which is far faster, more reliable, and still gives you 100% confidence.

I want to automate logging into Auth0 from my Cypress tests. But hopefully in a good way. Not a bad way. Wouldn't want to make Brian sad.

Commanding Auth0

To automate our login, we're going to use the auth0-js client library. This is the same library the application uses; but we're going to do something subtly different with it.

The application uses authorize to log users in. This function redirects the user into the Auth0 lock screen, and then, post authentication, redirects the user back to the application with a token in the URL. The app parses the token (using the auth0 client library) and sets the token and the expiration of said token in the browser sessionStorage.

What we're going to do is automate our login by using login instead. First of all, we need to add auth0-js as a dependency of our e2e tests:


yarn add auth0-js --dev

Next, we're going to create ourselves a custom command called loginAsAdmin:


const auth0 = require('auth0-js');

Cypress.Commands.add('loginAsAdmin', (overrides = {}) => {
    Cypress.log({
        name: 'loginAsAdminBySingleSignOn'
    });

    const webAuth = new auth0.WebAuth({
        domain: 'my-super-duper-domain.eu.auth0.com', // Get this from https://manage.auth0.com/#/applications and your application
        clientID: 'myclientid', // Get this from https://manage.auth0.com/#/applications and your application
        responseType: 'token id_token'
    });

    webAuth.client.login(
        {
            realm: 'Username-Password-Authentication',
            username: 'mytestemail@something.co.uk',
            password: 'SoVeryVeryVery$ecure',
            audience: 'myaudience', // Get this from https://manage.auth0.com/#/apis and your api, use the identifier property
            scope: 'openid email profile'
        },
        function(err, authResult) {
            // Auth tokens in the result or an error
            if (authResult && authResult.accessToken && authResult.idToken) {
                const token = {
                    accessToken: authResult.accessToken,
                    idToken: authResult.idToken,
                    // Set the time that the access token will expire at
                    expiresAt: authResult.expiresIn * 1000 + new Date().getTime()
                };

                window.sessionStorage.setItem('my-super-duper-app:storage_token', JSON.stringify(token));
            } else {
                console.error('Problem logging into Auth0', err);
    throw err;
            }
        }
    );
});

This command logs in using the auth0-js API and then sets the result into sessionStorage in the same way that our app does. This allows our app to read the value out of sessionStorage and use it. We're also going to put together one other command:


Cypress.Commands.add('visitHome', (overrides = {}) => {
    cy.visit('/', {
        onBeforeLoad: win => {
            win.sessionStorage.clear();
        }
    })
});

This visits the root of our application and wipes the sessionStorage. This is necessary because Cypress doesn't clear down sessionStorage between tests. (That's going to change though.)

Using It

Let's write a test that uses our new commands to see if it gets access to our admin functionality:


describe('access secret admin functionality', () => {
    it('should be able to navigate to', () => {
        cy.visitHome()
            .loginAsAdmin()
            .get('[href="/secret-adminny-stuff"]') // This link should only be visible to admins
            .click()
            .url()
            .should('contain', 'secret-adminny-stuff/'); // non-admins should be redirected away from this url
    });
});

Well, the test looks good but it's failing. If I fire up the Chrome Dev Tools in Cypress (did I mention that Cypress is absolutely fabulous?) then I see this response tucked away in the network tab:


{error: "unauthorized_client",…} error : "unauthorized_client" error_description : "Grant type 'http://auth0.com/oauth/grant-type/password-realm' not allowed for the client."

Hmmm... So sad. If you go to https://manage.auth0.com/#/applications, select your application, Show Advanced Settings and Grant Types you'll see a Password option is unselected.

Select it, Save Changes and try again.

You now have a test which automates your Auth0 login using Cypress and goes on to test your application functionality with it!

One More Thing...

It's worth saying that it's worth setting up different tenants in Auth0 to support your testing scenarios. This is generally a good idea so you can separate your testing accounts from Production accounts. Further to that, you don't need to have your Production setup supporting the Password Grant Type.

Also, if you're curious about what the application under test is like then read this.

Sunday, 24 June 2018

VSTS and EF Core Migrations

Let me start by telling you a dirty secret. I have an ASP.Net Core project that I build with VSTS. It is deployed to Azure through a CI / CD setup in VSTS. That part I'm happy with. Proud of even. Now to the sordid hiddenness: try as I might, I've never found a nice way to deploy Entity Framework database migrations as part of the deployment flow. So I have [blushes with embarrassment] been using the Startup of my ASP.Net core app to run the migrations on my database. There. I said it. You all know. Absolutely filthy. Don't judge me.

If you care to google, you'll find various discussions around this, and various ways to tackle it. Most of which felt like too much hard work and so I never attempted.

It's also worth saying that being on VSTS made me less likely to give these approaches a go. Why? Well, the feedback loop for debugging a CI / CD setup is truly sucky. Make a change. Wait for it to trickle through the CI / CD flow (10 mins at least). Spot a problem, try and fix. Start waiting again. Repeat until you succeed. Or, if you're using the free tier of VSTS, repeat until you run out of build minutes. You have a limited number of build minutes per month with VSTS. Last time I fiddled with the build, I bled my way through a full month's minutes in 2 days. I have now adopted the approach of only playing with the setup in the last week of the month. That way if I end up running out of minutes, at least I'll roll over to the new allowance in a matter of days.

Digression over. I could take the guilt of my EF migrations secret no longer, I decided to try and tackle it another way. I used the approach suggested by Andre Broers here:

I worked around by adding a dotnetcore consoleapp project where I run the migration via the Context. In the Build I build this consoleapp in the release I execute it.

Console Yourself

First things first, we need a console app added to our solution. Fire up PowerShell in the root of your project and:


md MyAwesomeProject.MigrateDatabase
cd .\MyAwesomeProject.MigrateDatabase\
dotnet new console

Next we need that project to know about Entity Framework and also our DbContext (which I store in a dedicated project):


dotnet add package Microsoft.EntityFrameworkCore.Design
dotnet add package Microsoft.EntityFrameworkCore.SqlServer
dotnet add reference ..\MyAwesomeProject.Database\MyAwesomeProject.Database.csproj

Add our new project to our solution: (I always forget to do this)


cd ../
dotnet sln add .\MyAwesomeProject.MigrateDatabase\MyAwesomeProject.MigrateDatabase.csproj

You should now be the proud possessor of a .csproj file that looks like this:


<Project Sdk="Microsoft.NET.Sdk">

  <PropertyGroup>
    <OutputType>Exe</OutputType>
    <TargetFramework>netcoreapp2.1</TargetFramework>
  </PropertyGroup>

  <ItemGroup>
    <PackageReference Include="Microsoft.EntityFrameworkCore.Design" Version="2.1.1" />
    <PackageReference Include="Microsoft.EntityFrameworkCore.SqlServer" Version="2.1.1" />
  </ItemGroup>

  <ItemGroup>
    <ProjectReference Include="..\MyAwesomeProject.Database\MyAwesomeProject.Database.csproj" />
  </ItemGroup>

</Project>

Replace the contents of the Program.cs file with this:


using System;
using System.IO;
using MyAwesomeProject.Database;
using Microsoft.EntityFrameworkCore;

namespace MyAwesomeProject.MigrateDatabase {
    class Program {
        // Example usage:
        // dotnet MyAwesomeProject.MigrateDatabase.dll "Server=(localdb)\\mssqllocaldb;Database=MyAwesomeProject;Trusted_Connection=True;"
        static void Main(string[] args) {
            if (args.Length == 0)
                throw new Exception("No connection string supplied!");

            var myAwesomeProjectConnectionString = args[0];

            // Totally optional debug information
            Console.WriteLine("About to migrate this database:");
            var connectionBits = myAwesomeProjectConnectionString.Split(";");
            foreach (var connectionBit in connectionBits) {
                if (!connectionBit.StartsWith("Password", StringComparison.CurrentCultureIgnoreCase))
                    Console.WriteLine(connectionBit);
            }

            try {
                var optionsBuilder = new DbContextOptionsBuilder<MyAwesomeProjectContext>();
                optionsBuilder.UseSqlServer(myAwesomeProjectConnectionString);

                using(var context = new MyAwesomeProjectContext(optionsBuilder.Options)) {
                    context.Database.Migrate();
                }
                Console.WriteLine("This database is migrated like it's the Serengeti!");
            } catch (Exception exc) {
                var failedToMigrateException = new Exception("Failed to apply migrations!", exc);
                Console.WriteLine($"Didn't succeed in applying migrations: {exc.Message}");
                throw failedToMigrateException;
            }
        }
    }
}

This code takes the database connection string passed as an argument, spins up a db context with that, and migrates like it's the Serengeti.

Build It!

The next thing we need is to ensure that this is included as part of the build process in VSTS. The following commands need to be run during the build to include the MigrateDatabase project in the build output in a MigrateDatabase folder:


cd MyAwesomeProject.MigrateDatabase
dotnet build
dotnet publish --configuration Release --output $(build.artifactstagingdirectory)/MigrateDatabase

There's various ways to accomplish this which I wont reiterate now. I recommend YAML.

Deploy It!

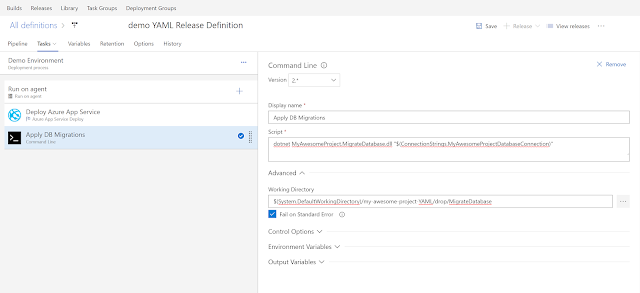
Now to execute our console app as part of the deployment process we need to add a CommandLine task to our VSTS build definition. It should execute the following command:


dotnet MyAwesomeProject.MigrateDatabase.dll "$(ConnectionStrings.MyAwesomeProjectDatabaseConnection)"

In the following folder:


$(System.DefaultWorkingDirectory)/my-awesome-project-YAML/drop/MigrateDatabase

Do note that the command uses the ConnectionStrings.MyAwesomeProjectDatabaseConnection variable which you need to create and set to the value of your connection string.

Give It A Whirl

Let's find out what happens when the rubber hits the road. I'll add a new entity to my database project:


using System;

namespace MyAwesomeProject.Database.Entities {
    public class NewHotness {
        public Guid NewHotnessId { get; set; }
    }
}

And reference it in my DbContext:


using MyAwesomeProject.Database.Entities;
using Microsoft.EntityFrameworkCore;

namespace MyAwesomeProject.Database {
    public class MyAwesomeProjectContext : DbContext {
        public MyAwesomeProjectContext(DbContextOptions<MyAwesomeProjectContext> options) : base(options) { }

        // ...
  
        public DbSet<NewHotness> NewHotnesses { get; set; }

        // ...
    }
}

Let's let EF know by adding a migration to my project:


dotnet ef migrations add TestOurMigrationsApproach

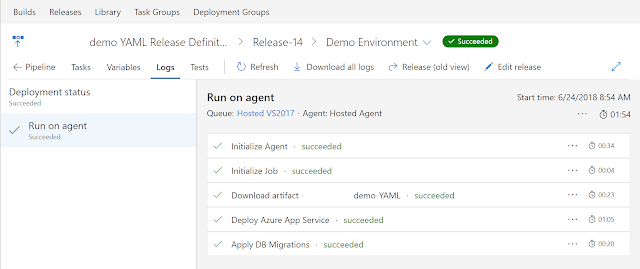
Commit my change, push it to VSTS, wait for the build to run and a deployment to take place.... Okay. It's done. Looks good.

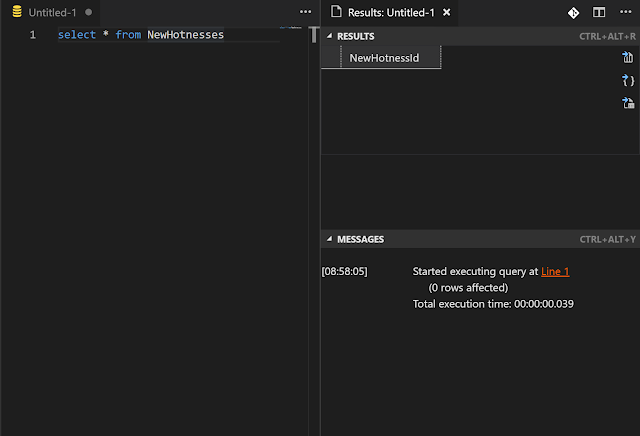
Let's take a look in the database:


select * from NewHotnesses
go

It's there! We are migrating our database upon deployment; and not in our ASP.Net Core app itself. I feel a burden lifted.

Wrapping Up

The EF Core team are aware of the lack of guidance around deploying migrations and have recently announced plans to fix that in the docs. You can track the progress of this issue here. There's good odds that once they come out with this I'll find there's a better way than the approach I've outlined in this post. Until that glorious day!

Saturday, 16 June 2018

VSTS... YAML up!

For the longest time I've been using the likes of Travis and AppVeyor to build open source projects that I work on. They rock. I've also recently been dipping my toes back in the water of Visual Studio Team Services. VSTS offers a whole stack of stuff, but my own area of interest has been the Continuous Integration / Continuous Deployment offering.

Historically I have been underwhelmed by the CI proposition of Team Foundation Server / VSTS. It was difficult to debug, difficult to configure, difficult to understand. If it worked... Great! If it didn't (and it often didn't), you were toast. But things done changed! I don't know when it happened, but VSTS is now super configurable. You add tasks / configure them, build and you're done! It's really nice.

However, there's been something I've been missing from Travis, AppVeyor et al. Keeping my build script with my code. Travis has .travis.yml, AppVeyor has appveyor.yml. VSTS, what's up?

The New Dawn

Up until now, really not much. It just wasn't possible. Until it was:

When I started testing it out I found things to like and some things I didn't understand. Crucially, my CI now builds based upon .vsts-ci.yml. YAML baby!

It Begins!

You can get to "Hello World" by looking at the docs here and the examples here. But what you really want is your existing build, configured in the UI, exported to YAML. That doesn't seem to quite exist, but there's something that gets you part way. Take a look:

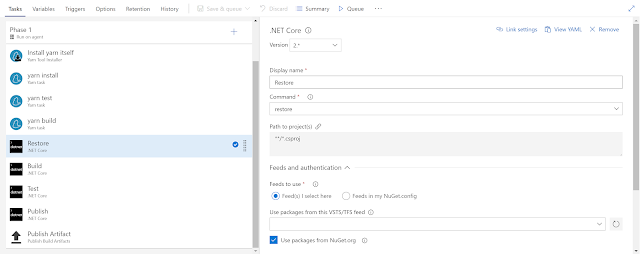
If you notice, in the top right of the screen, each task now allows you click on a new "View YAML" button. It's kinda Ronseal:

Using this hotness you can build yourself a .vsts-ci.yml file task by task.

A Bump in the Road

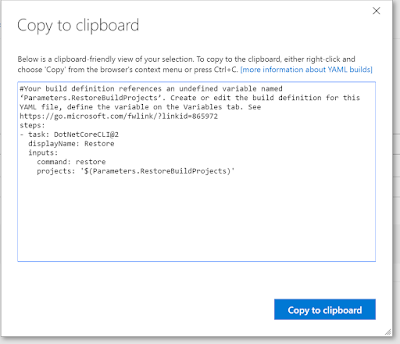
If you look closely at the message above you'll see there's a message about an undefined variable.


#Your build definition references an undefined variable named ‘Parameters.RestoreBuildProjects’. Create or edit the build definition for this YAML file, define the variable on the Variables tab. See https://go.microsoft.com/fwlink/?linkid=865972
steps:
- task: DotNetCoreCLI@2
  displayName: Restore
  inputs:
    command: restore
    projects: '$(Parameters.RestoreBuildProjects)'

Try as I might, I couldn't locate Parameters.RestoreBuildProjects. So no working CI build for me. Then I remembered Zoltan Erdos. He's hard to forget. Or rather, I remembered an idea of his which I will summarise thusly: "Have a package.json in the root of your repo, use the scripts for individual tasks and you have a cross platform task runner".

This is a powerful idea and one I decided to put to work. My project is React and TypeScript on the front end, and ASP.Net Core on the back. I wanted a package.json in the root of the repo which I could install dependencies, build, test and publish my whole app. I could call into that from my .vsts-ci.yml file. Something like this:


{
  "name": "my-amazing-project",
  "version": "1.0.0",
  "author": "John Reilly ",
  "license": "MIT",
  "private": true,
  "scripts": {
    "preinstall": "yarn run install:clientapp && yarn run install:web",
    "install:clientapp": "cd MyAmazingProject.ClientApp && yarn install",
    "install:web": "dotnet restore",
    "prebuild": "yarn install",
    "build": "yarn run build:clientapp && yarn run build:web",
    "build:clientapp": "cd MyAmazingProject.ClientApp && yarn run build",
    "build:web": "dotnet build --configuration Release",
    "postbuild": "yarn test",
    "test": "yarn run test:clientapp && yarn run test:web",
    "test:clientapp": "cd MyAmazingProject.ClientApp && yarn test",
    "test:web": "cd MyAmazingProject.Web.Tests && dotnet test",
    "publish:web": "cd MyAmazingProject.Web && dotnet publish MyAmazingProject.Web.csproj --configuration Release"
  }
}

It doesn't matter if I have "an undefined variable named ‘Parameters.RestoreBuildProjects’". I now have no need to use all the individual tasks in a build. I can convert them into a couple of scripts in my package.json. So here's where I've ended up for now. I've a .vsts-ci.yml file which looks like this:


queue: Hosted VS2017

steps:
- task: geeklearningio.gl-vsts-tasks-yarn.yarn-installer-task.YarnInstaller@2
  displayName: install yarn itself
  inputs:
    checkLatest: true
- task: geeklearningio.gl-vsts-tasks-yarn.yarn-task.Yarn@2
  displayName: yarn build and test
  inputs:
    Arguments: build
- task: geeklearningio.gl-vsts-tasks-yarn.yarn-task.Yarn@2
  displayName: yarn publish:web
  inputs:
    Arguments: 'run publish:web --output $(build.artifactstagingdirectory)/MyAmazingProject'
- task: PublishBuildArtifacts@1
  displayName: publish build artifact
  inputs:
    PathtoPublish: '$(build.artifactstagingdirectory)'

This file does the following:

  1. Installs yarn. (By the way VSTS, what's with not having yarn installed by default? I'll say this for the avoidance of doubt: in the npm cli space: yarn has won.)
  2. Install our dependencies, build the front end and back end, run all the tests. Effectively yarn build.
  3. Publish our web app to a directory. Effectively yarn run publish:web. This is only separate because we want to pass in the output directory and so it's just easier for it to be a separate step.
  4. Publish the build artefact to TFS. (This will go on to be picked up by the continuous deployment mechanism and published out to Azure.)

I much prefer this to what I had before. I feel there's much more that can be done here as well. I'm looking forward to the continuous deployment piece becoming scriptable too.

Thanks to Zoltan and props to the TFVS team!

Sunday, 13 May 2018

Compromising: A Guide for Developers

It is a truth universally acknowledged, that a single developer, will not be short of an opinion. Opinions on tabs vs spaces. Upon OOP vs FP. Upon classes vs functions. Just opinions, opinions, opinions. Opinions that are felt with all the sincerity of a Witchfinder General. And, alas, not always the same level of empathy.

Given the wealth of strongly felt desires, it's kind of amazing that developers ever manage to work together. It's rare to find a fellow dev that agrees entirely with your predilections. So how do people ever get past the "you don't use semi-colons; what's wrong with you"? Well, not easily to be honest. It involves compromise.

On Compromise

We've all been in the position where we realise that there's something we don't like in a codebase. The ordering of members in a class, naming conventions, a lack of tests... Something.

Then comes the moment of trepidation. You suggest a change. You suggest difference. It's time to find out if you're working with psychopaths. It's not untypical to find that you just have to go with the flow.

  • "You've been using 3 spaces?"
  • "Yes we use 3 spaces."
  • "Okay... So we'll be using 3 spaces..." [backs away carefully]

I've been in this position so many times I've learned to adapt. It helps that I'm a malleable sort anyway. But what if there were another way?

Weighting Opinion

Sometimes your opinion is... Well.... Just an opinion. Other opinions are legitimate. At least in theory. If you can acknowledge that, you already have a level of self knowledge not gifted to all in the dev community. If you're able to get that far I feel there's something you might want to consider.

Let me frame this up: there's a choice to be made around an approach that could be used in a codebase. There are 2 camps in the team; 1 camp advocating for 1 approach. The other for a different approach. Either one is functionally legitimate. They work. It's just a matter of preference of choice. How do you choose now? Let's look at a technique for splitting the difference.

Voting helps. But let's say 50% of the team wants 1 approach and 50% wants the other. What then? Or, to take a more interesting idea, what say 25% want 1 approach and 75% want the other? If it's just 1 person, 1 vote then the 75% wins and that's it.

But before we all move on, let's consider another factor. How much do people care? What if the 25% are really, really invested in the choice they're advocating for and the 75% just have a mild preference? From that point forwards the 25% are likely going to be less happy. Maybe they'll even burn inside. They're certainly going to be less productive.

It's because of situations like this that weighting votes becomes useful. Out of 5, how much do you care? If one person cares "5 out of 5" and the other three are "1 out of 5".... Well go with the 25% It matters to them and that it matters to them should matter to you.

I'll contend that rolling like this makes for more content, happier and more productive teams. Making strength of feeling a factor in choices reduces friction and increases the peace.

I've only recently discovered this technique and I can't claim credit for it. I learned it from the awesome Jamie McCrindle. I commend to you! Be happier!

Saturday, 28 April 2018

Using Reflection to Identify Unwanted Dependencies

I having a web app which is fairly complex. It's made up of services, controllers and all sorts of things. So far, so unremarkable. However, I needed to ensure that the controllers did not attempt to access the database via any of their dependencies. Or their dependencies, dependencies. Or their dependencies. You get my point.

The why is not important here. What's significant is the idea of walking a dependency tree and identifying, via a reflection based test, when such unwelcome dependencies occur, and where.

When they do occur the test should fail, like this:


[xUnit.net 00:00:01.6766691]     My.Web.Tests.HousekeepingTests.My_Api_Controllers_do_not_depend_upon_the_database [FAIL]
[xUnit.net 00:00:01.6782295]       Expected dependsUponTheDatabase.Any() to be False because My.Api.Controllers.ThingyController depends upon the database through My.Data.Services.OohItsAService, but found True.

What follows is an example of how you can accomplish this. It is exceedingly far from the most beautiful code I've ever written. But it works. One reservation I have about it is that it doesn't use the Dependency Injection mechanism used at runtime (AutoFac). If I had more time I would amend the code to use that instead; it would become an easier test to read if I did. Also it would better get round the limitations of the code below. Essentially the approach relies on the assumption of there being 1 interface and 1 implementation. That's often not true in complex systems. But this is good enough to roll with for now.


using System;
using System.Collections.Generic;
using System.Linq;
using System.Reflection;
using FluentAssertions;
using My.Data;
using My.Web.Controllers;
using Xunit;

namespace My.Web.Tests {
    public class OiYouThereGetOutTests {
        [Fact]
        public void My_Controllers_do_not_depend_upon_the_database() {
            var myConcreteTypes = GetMyAssemblies()
                .SelectMany(assembly => assembly.GetTypes())
                .ToArray();

            var controllerTypes = typeof(My.Web.Startup).Assembly.GetTypes()
                .Where(myWebType =>
                    myWebType != typeof(Microsoft.AspNetCore.Mvc.Controller) &&
                    typeof(Microsoft.AspNetCore.Mvc.Controller).IsAssignableFrom(myWebType));

            foreach (var controllerType in controllerTypes) {
                var allTheTypes = GetDependentTypes(controllerType, myConcreteTypes);
                allTheTypes.Count.Should().BeGreaterThan(0);
                var dependsUponTheDatabase = allTheTypes.Where(keyValue => keyValue.Key == typeof(MyDbContext));
                dependsUponTheDatabase.Any().Should().Be(false, because: $"{controllerType} depends upon the database through {string.Join(", ", dependsUponTheDatabase.Select(dod => dod.Value))}");
            }
        }

        private static Dictionary<Type, Type> GetDependentTypes(Type type, Type[] typesToCheck, Dictionary<Type, Type> typesSoFar = null) {
            var types = typesSoFar ?? new Dictionary<Type, Type>();
            foreach (var constructor in type.GetConstructors().Where(ctor => ctor.IsPublic)) {
                foreach (var parameter in constructor.GetParameters()) {
                    if (parameter.ParameterType.IsInterface) {
                        if (parameter.ParameterType.IsGenericType) {
                            foreach (var genericType in parameter.ParameterType.GenericTypeArguments) {
                                AddIfMissing(types, genericType, type);
                            }
                        } else {
                            var typesImplementingInterface = TypesImplementingInterface(parameter.ParameterType, typesToCheck);
                            foreach (var typeImplementingInterface in typesImplementingInterface) {
                                AddIfMissing(types, typeImplementingInterface, type);
                                AddIfMissing(types, GetDependentTypes(typeImplementingInterface, typesToCheck, types).Keys.ToList(), type);
                            }
                        }
                    } else {
                        AddIfMissing(types, parameter.ParameterType, type);
                        AddIfMissing(types, GetDependentTypes(parameter.ParameterType, typesToCheck, types).Keys.ToList(), type);
                    }
                }
            }
            return types;
        }

        private static void AddIfMissing(Dictionary<Type, Type> types, Type typeToAdd, Type parentType) {
            if (!types.Keys.Contains(typeToAdd))
                types.Add(typeToAdd, parentType);
        }

        private static void AddIfMissing(Dictionary<Type, Type> types, IList<Type> typesToAdd, Type parentType) {
            foreach (var typeToAdd in typesToAdd) {
                AddIfMissing(types, typeToAdd, parentType);
            }
        }

        private static Type[] TypesImplementingInterface(Type interfaceType, Type[] typesToCheck) =>
            typesToCheck.Where(type => !type.IsInterface && interfaceType.IsAssignableFrom(type)).ToArray();

        private static bool IsRealClass(Type testType) =>
            testType.IsAbstract == false &&
            testType.IsGenericType == false &&
            testType.IsGenericTypeDefinition == false &&
            testType.IsInterface == false;

        private static Assembly[] GetMyAssemblies() =>
            AppDomain
            .CurrentDomain
            .GetAssemblies()
            // Not strictly necessary but it reduces the amount of types returned
            .Where(assembly => assembly.GetName().Name.StartsWith("My")) 
            .ToArray();
    }
}

Monday, 26 March 2018

It's Not Dead 2: mobx-react-devtools and the undead

I spent today digging through our webpack 4 config trying to work out why a production bundle contained code like this:


if("production"!==e.env.NODE_ENV){//...

My expectation was that with webpack 4 and 'mode': 'production' this meant that behind the scenes all process.env.NODE_ENV statements should be converted to 'production'. Subsequently Uglify would automatically get its groove on with the resulting if("production"!=="production") ... and et voilΓ !... Strip the dead code.

It seemed that was not the case. I was seeing (regrettably) undead code. And who here actually likes the undead?

Who Betrayed Me?

My beef was with webpack. It done did me wrong. Or... So I thought. webpack did nothing wrong. It is pure and good and unjustly complained about. It was my other love: mobx. Or to be more specific: mobx-react-devtools.

It turns out that the way you use mobx-react-devtools reliably makes the difference. It's the cause of the stray ("production"!==e.env.NODE_ENV) statements in our bundle output. After a long time I happened upon this issue which contained a gem by one Giles Butler. His suggested way to reference mobx-react-devtools is (as far as I can tell) the solution!

On a dummy project I had the mobx-react-devtools advised code in place:


import * as React from 'react';
import { Layout } from './components/layout';
import DevTools from 'mobx-react-devtools';

export const App: React.SFC<{}> = _props => (
    <div className="ui container">
        <Layout />
        {process.env.NODE_ENV !== 'production' ? <DevTools position={{ bottom: 20, right: 20 }} /> : null}
    </div>
);

With this I had a build size of 311kb. Closer examination of my bundle revealed that my bundle.js was riddled with ("production"!==e.env.NODE_ENV) statements. Sucks, right?

Then I tried this instead:


import * as React from 'react';
import { Layout } from './components/layout';
const { Fragment } = React;

const DevTools = process.env.NODE_ENV !== 'production' ? require('mobx-react-devtools').default : Fragment;

export const App: React.SFC<{}> = _props => (
    <div className="ui container">
        <Layout />
        <DevTools position={{ bottom: 20, right: 20 }} />
    </div>
);

With this approach I got a build size of 191kb. This was thanks to the dead code being actually stripped. That's a saving of 120kb!

Perhaps We Change the Advice?

There's a suggestion that the README should be changed to reflect this advice - until that happens, I wanted to share this solution. Also, I've a nagging feeling that I've missed something pertinent here; if someone knows something that I should... Tell me please!

Sunday, 25 March 2018

Uploading Images to Cloudinary with the Fetch API

I was recently checking out a very good post which explained how to upload images using React Dropzone and SuperAgent to Cloudinary.

It's a brilliant post; you should totally read it. Even if you hate images, uploads and JavaScript. However, there was one thing in there that I didn't want; SuperAgent. It's lovely but I'm a Fetch guy. That's just how I roll. The question is, how do I do the below using Fetch?


  handleImageUpload(file) {
    let upload = request.post(CLOUDINARY_UPLOAD_URL)
                     .field('upload_preset', CLOUDINARY_UPLOAD_PRESET)
                     .field('file', file);

    upload.end((err, response) => {
      if (err) {
        console.error(err);
      }

      if (response.body.secure_url !== '') {
        this.setState({
          uploadedFileCloudinaryUrl: response.body.secure_url
        });
      }
    });
  }

Well it actually took me longer to work out than I'd like to admit. But now I have, let me save you the bother. To do the above using Fetch you just need this:


  handleImageUpload(file) {
    const formData = new FormData();
    formData.append("file", file);
    formData.append("upload_preset", CLOUDINARY_UPLOAD_PRESET); // Replace the preset name with your own

    fetch(CLOUDINARY_UPLOAD_URL, {
      method: 'POST',
      body: formData
    })
      .then(response => response.json())
      .then(data => {
        if (data.secure_url !== '') {
          this.setState({
            uploadedFileCloudinaryUrl: data.secure_url
          });
        }
      })
      .catch(err => console.error(err))
  }

To get a pre-canned project to try this with take a look at Damon's repo.

Wednesday, 7 March 2018

It's Not Dead: webpack and dead code elimination limitations

Every now and then you can be surprised. Your assumptions turn out to be wrong.

Webpack has long supported the notion of dead code elimination. webpack facilitates this through use of the DefinePlugin. The compile time value of process.env.NODE_ENV is set either to 'production' or something else. If it's set to 'production' then some dead code hackery can happen. Libraries like React make use of this to serve up different, and crucially smaller, production builds.

A (pre-webpack 4) production config file will typically contain this code:


new webpack.DefinePlugin({
    'process.env.NODE_ENV': JSON.stringify('production')
}),
new UglifyJSPlugin(),

The result of the above config is that webpack will inject the value 'production' everywhere in the codebase where a process.env.NODE_ENV can be found. (In fact, as of webpack 4 setting this magic value is out-of-the-box behaviour for Production mode; yay the #0CJS!)

What this means is, if you've written:


if (process.env.NODE_ENV !== 'production') {
  // Do a development mode only thing
}

webpack can and will turn this into


if ('production' !== 'production') {
  // Do a development mode only thing
}

The UglifyJSPlugin is there to minify the JavaScript in your bundles. As an added benefit, this plugin is smart enough to know that 'production' !== 'production' is always false. And because it's smart, it chops the code. Dead code elimated.

You can read more about this in the webpack docs.

Limitations

Given what I've said, consider the following code:


export class Config {
    // Other properties

    get isDevelopment() {
        return process.env.NODE_ENV !== 'production';
    }
}

This is a config class that exposes the expression process.env.NODE_ENV !== 'production' with the friendly name isDevelopment. You'd think that dead code elimination would be your friend here. It's not.

My personal expection was that dead code elimination would treat Config.isDevelopment and the expression process.env.NODE_ENV !== 'production' identically. Because they're identical.

However, this turns out not to be the case. Dead code elimination works just as you would hope when using the expression process.env.NODE_ENV !== 'production' directly in code. However webpack only performs dead code elimination for the direct usage of the process.env.NODE_ENV !== 'production' expression. I'll say that again: if you want dead code elimination then use the injected values; not an encapsulated version of them. It turns out you cannot rely on webpack flowing values through and performing dead code elimination on that basis.

The TL;DR: if you want to elimate dead code then *always* use process.env.NODE_ENV !== 'production'; don't abstract it. It doesn't work.

UglifyJS is smart. But not that smart.

Sunday, 25 February 2018

ts-loader 4 / fork-ts-checker-webpack-plugin 0.4

webpack 4 has shipped!

ts-loader

The ts-loader 4 is available too. For details see our release here. To start using ts-loader 4:

  • When using yarn: yarn add ts-loader@4.1.0 -D
  • When using npm: npm install ts-loader@4.1.0 -D

Remember to use this in concert with the webpack 4. To see a working example take a look at the "vanilla" example.

fork-ts-checker-webpack-plugin

There's more! You may like to use the fork-ts-checker-webpack-plugin, (aka the ts-loader turbo-booster). The webpack compatible version has been released to npm as 0.4.1:

  • When using yarn: yarn add fork-ts-checker-webpack-plugin@0.4.1 -D
  • When using npm: npm install fork-ts-checker-webpack-plugin@0.4.1 -D

To see a working example take a look at the "fork-ts-checker" example.